Popular Post

Follow My Facebook

Instagram
Call of Duty 3
AGUS BLUE DARK. Powered by Blogger.

Recent post

Archive for 07/19/14

30 Trik Photoshop Retouching Tutorial


30 Trik Photoshop Retouching Tutorial

Adobe Photoshop merupakan software yang biasa digunakan oleh seorang photographer untuk melakukan retouch foto-foto atau gambar. Tutorial di bawah ini berasal dari beberapa website yang akan membantu Anda membuat perubahan drastis foto asli Anda menjadi foto yang luar biasa.

Cara merubah warna rambut, membuat hidung agak mancung, membuat mata lebih indah dan merubah warna kulit adalah beberapa tutorial Photoshop yang akan Anda pelajari. Memang, bahasa yang digunakan dari website di bawah ini adalah Bahasa Inggris. Bagi Anda yang mungkin kurang memahami bahasa tersebut, mungkin ada baiknya Anda baca tulisan saya tentang "Cara menerjemahkan situs berbahasa Inggris" ataupun tulisan yang ada di website tersebut bisa Anda simpan terlebih dulu dalam format Microsoft Word, lalu baru Anda terjemahkan kemudian. Baca caranya DI SINI.
  1. Cara mengurangi keriput pada wajah
  2. Teknik retouch foto bagi pemula
  3. Retouch foto studio portrait
  4. Trik retouch rambut
  5. Cara cepat retouch facial wajah
  6. Teknik menghaluskan wajah dengan airbrush tool
  7. Membuat make up digital dalam waktu 10 menit
  8. Membuat gigi lebih putih dan bersinar
  9. Retouch facial wajah secara sederhana
  10. Membuat kulit lebih halus dan lembut
  11. Memperbesar ukuran payudara
  12. Retouch rambut secara professional (Video)
  13. Membuat efek wajah menjadi lebih tua I
  14. Cara memutihkan gigi menggunakan Photoshop CS4
  15. Membuat efek wajah menjadi lebih tua II
  16. Merubah warna rambut I
  17. Merubah warna rambut II
  18. Membuat warna kulit menjadi lebih sempurna
  19. Mempercantik bentuk hidung
  20. Merubah warna rambut III
  21. Memberi efek lensa kontak pada mata
  22. Makeover wajah
  23. Merubah warna rambut IV
  24. Menjadikan badan lebih langsing
  25. Merubah warna kulit tubuh
  26. Make up sederhana menggunakan Photoshop
  27. Retouch foto model bikini
  28. Membuat kulit wajah lebih lembut
  29. Manipulasi foto dengan sederhana
  30. Merubah warna mata


By: http://www.blogbiztutor.com
Cara membuat false color –  Tutorial kali ini saya akan membahas mengenai false color kalo dalam bahasa indonesia yaitu salah warna . false color sebenernya mirip dengan infra red perbedaannya untuk infra red langsung settingan dari kamera infra red tetapi untuk finishing biasanya tetap menggunakan photoshop channel mixer. Namun disini saya tidak akan membahas apa itu false color ataupun infrared takutnya salah mendefinisikan.
 Cara membuat false color
1. Foto yang akan kita edit
 Cara membuat false color
4. Gunakan Adjdustment layer Brigntness/Contrast lakukan teknik masking dengan brush untuk area yang akan kita buat gelap dan mana yang akan kita buat terang. Atau yang biasa kita sebut dengan  membuat vignete kitu mun teu salah mah. Jadi intinya pembuatan vignete ini agar pada saat kita melihat foto, object tetap fokus tanpa mengurangi keindahah Background (menurut saya).
 Cara membuat false color
 Cara membuat false color
5. Adjdustment layer Color Fill, Blending Mode Softlight seperti terlihat pada gambar
 Cara membuat false color
6. Adjdustment layer Curve atur RED, GREEN & BLUE seperti terlihat pada gambar pengaturan pada gambar tidak menjadi patokan tergantung gelap terang foto atur sesuai keinginan.
 Cara membuat false color
7. Adjdustment layer Selective Color atur kembali RED, GREEN, YELLOWS seperti terlihat pada gambar.
 Cara membuat false color
8. Gunakan kembali Adjdustment layer Selective Color Seperti terlihat pada gambar
 Cara membuat false color
9. Adjdustment layer Curve atur seperti terlihat pada gambar
 Cara membuat false color
10. Adjdustment layer Level atur seperti terlihat pada gambar. (SELESAI)
 Cara membuat false color
Kreasikan sendiri

By :http://photoshopku.net/
Tutorial untuk bulan ini akhirnya beres, karena masih banyak nya pengguna yang belum mengerti trik dasar dalam mengedit photo, untuk itu saya akan membuatkan Trik DasarRetouch Photo dengan Photoshop, karena trik ini merupakan tutorial dasar yang sering digunakan oleh editor photo.
Dalam hal  Retouch Photo yang harus diperhatikan adalah, warna kulit, gigi, kecerahan dan kulit yang mulus.
warna+kulit11 Trik Dasar Retouch Photo dengan Photoshop

1. Siapkan foto yang akan di edit.
warna+kulit Trik Dasar Retouch Photo dengan Photoshop
2. Pilih Magic Wand tool, seleksilah pada bagian muka, dan lakukan trik Feather tejanCtrl+Alt+D atau Select-Modify-Feather , naikan radiusnya diatas 20
warna+kulit12 Trik Dasar Retouch Photo dengan Photoshop
warna+kulit2 Trik Dasar Retouch Photo dengan Photoshop
warna+kulit3 Trik Dasar Retouch Photo dengan Photoshop
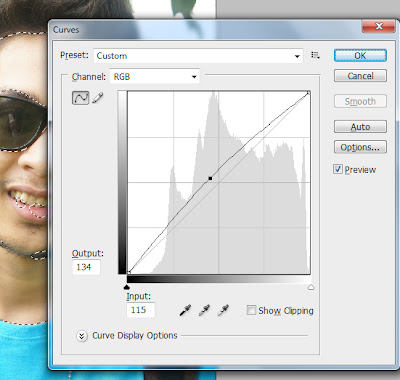
4. Tekan Ctrl+M (curves) naikan nilainya. dan sesuikan.
jika sudah tekan ctrl+D untuk melepaskan seleksi
5. Pada kasus photo tutorial ini ada bekas luka di daerah jidat, untuk menghilangkannya pilih Patch Tool.
warna+kulit5 Trik Dasar Retouch Photo dengan Photoshop
 lingkari bagian bagian yang ada lukanya, dan geser ke daerah kulit yang mulus. maka bekas luka akan hilang.
warna+kulit6 Trik Dasar Retouch Photo dengan Photoshop
warna+kulit13 Trik Dasar Retouch Photo dengan Photoshop
 6. Sekarang tajamkan warna/pencahayaannya, anda bisa menggunakan Brightness/contras, pilih image-Adjsutments-Brightness/contras. Sesuikan poin-poinnya tergantung dari kualiats awal photo.
warna+kulit8 Trik Dasar Retouch Photo dengan Photoshop
warna+kulit9 Trik Dasar Retouch Photo dengan Photoshop
7. Pada tahapn ke-6 sebenarnya sudah cukup untuk melakukan Retouch Photo, jika kita punya masalah dengan kulit yang tidak mulus, anda bisa memberikan efek menghaluskan kulit, saya memberikan 2 cara.
warna+kulit10 Trik Dasar Retouch Photo dengan Photoshop
8. Sekarang yang kurang adalah warna  gigi, siapa sih yang tidak mau giginya putih.yang mau putihcaranya disini

By :http://photoshopku.net/
Skin Retouching in Photoshop
This tutorial will help you learn how to speed up skin retouching and polish photos in Photoshop using basic techniques.

Original Photo

Original Photo

Step 1

Duplicate the background image and rename it to Layer 1.
Image 1

Step 2

Go to Filter > Other > High Pass and set the Radius to around 4.5 pixels.
Image 2
Image 3

Step 3

Change the Blending Options for Layer 1 from Normal to Soft Light and uncheck the eye to make Layer 1 invisible for the next step.
Image 4

Step 4

Duplicate the background image again and rename it to Layer 2. We’re creating an extra layer with an automatic smoothening underneath the skin, so pop it under Layer 1 and go to Image >Adjustments > Invert. Next go to Filter > Other > High Pass, set it to 4.5 pixels and for this layer change the blending options to Overlay. After doing this you can make Layer 1 visible again.
Invert
Image 5
Image 6
Image 7

Step 5

As you’ll see the image will be just slightly blurred and smoothen out but not the edges. On Layer 1 continue retouching using the Elliptical Marquee Tool. Circle the areas inside the face that need quick fixing, go to Filter > Noise > Median and max the pixels out to100 pixels. To make the process faster, repeat process in all areas using Ctrl-F (Command F on the Mac). This is a shortcut to apply the last filter which just makes life so much easier for you. I would suggest applying the Median effect as much as you can before you move on to the next step.
Image 8
Image 9
Image 10

Step 6

Flatten Image and use the Clone Stamp Tool mixed with a Soft Brush with the Flow set to around 30% to manually select areas next to one another, blend it in as much as you can using this tool to make further improvements to the skin. What we’re doing here is sampling areas of the face to even out the skin and with this technique you will also be getting rid of the shiny stuff.
Image 12
If you find that it is getting too smooth for your liking then its really up to you to take a step back, use less Clone Stamping, drop down it’s Opacity or re-size the brush correctly. This is just a quick demonstration to give you guys an idea of how to quickly retouch photos, with more time, effort and of course accuracy you will get a much better result.
Image 13

Step 7

This step here is to quickly balance out the whole lot, to do that we need that extra bit of shadow to be added to the overall image. Go to Image > Adjustments > Shadow/Highlight, then set the amount of Shadow to 20% and the Highlight can be left on 0.
Image 14

Final Result

This should have helped quickly smooth the skin, even out the tone of the entire face and balance lighting. To remove just pimples check out the Remove Pimples Using the Healing Brushes and Patch Tool tutorial.
Image 15

By : http://photoshopland.com/

- Copyright © 2013 Just- Tupai - Kurumi Tokisaki - Powered by Blogger - Designed by Johanes Djogan -